Navigating the Tuscany Trail with Ride with GPS: a practical guide to the official route
Over 400 km through Tuscany, across multiple days, on white roads and trails. To avoid getting lost you need a reliable route and a simple way to follow it. Ride with GPS is our technical partner: with the app you can study the route, split it into stages, download offline maps and navigate with voice directions even without cell service.
This guide covers everything you need to know: from the official route to on-the-ground navigation, with tips to save battery and avoid ending up stranded (metaphorically) mid-route.
Why Ride with GPS is our route partner
Ride with GPS doesn't lose waypoints. We tested the route by uploading and downloading it multiple times: same points, same coordinates, every time. Other systems tend to "round off" or simplify the track with each transfer. Over 400 km of junctions and trails, even half a meter of drift can send you the wrong way.
Then there's the practical side: nobody remembers coordinates, and while riding you don't know if you're at km 147 or 148. With waypoints and the cue sheet you can see base camps, water fountains, and detours right on the map. Everything you studied at home becomes reachable, not just in your head.
Note for BAS participants: with your Bike Adventure Series registration you get free access to all Ride with GPS Premium features on official routes: turn-by-turn navigation with voice directions, offline maps, unlimited downloads and sync with external devices. To unlock them, create your account on Ride with GPS and then redeem the Premium link you'll receive with your registration — Premium features are not automatically applied when creating an account.
Save the official route to your account
For BAS events you'll receive the route in two phases:
Study Route: sent in advance, practically identical to the final version (99%). Use it to study the course, choose accommodations, plan your stages and familiarize yourself with elevation profiles and key points. You can split it, add your own POIs and customize it as you like. Don't load it onto your GPS device though: you'll use the final version when you start.
Final Route: sent after our team's last on-bike reconnaissance, a few days before the event. If we find changes during the final test (a closed road, a better passage, a new point of interest), we correct them. This way you always have the most up-to-date version.
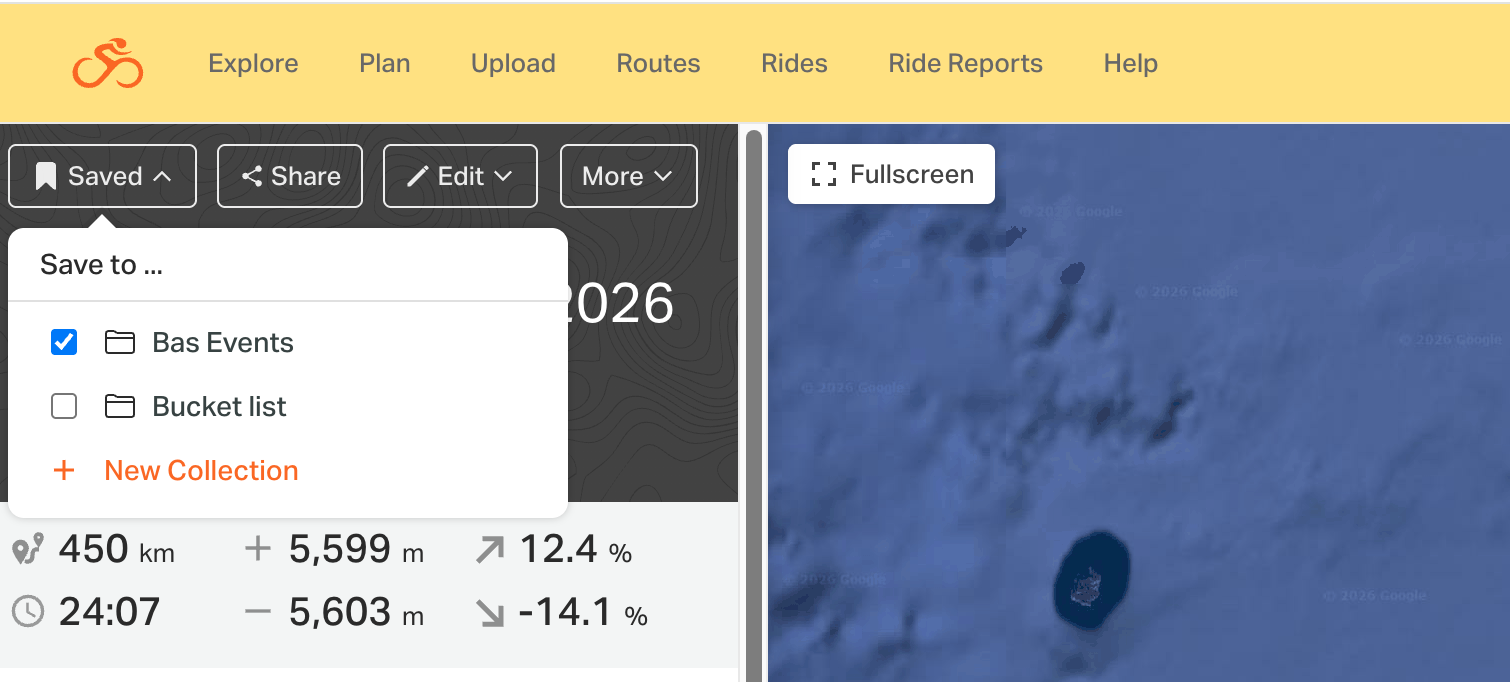
To have them ready to go in your account, just add them to your collection.
Plan your daily stages
Most participants spread the route over 3-5 stages, averaging 4 days to complete it. The easiest way is to use a single route file for the entire course and simply note down the km where each day ends. This way you avoid the risk of having multiple separate files and potentially forgetting to load one.
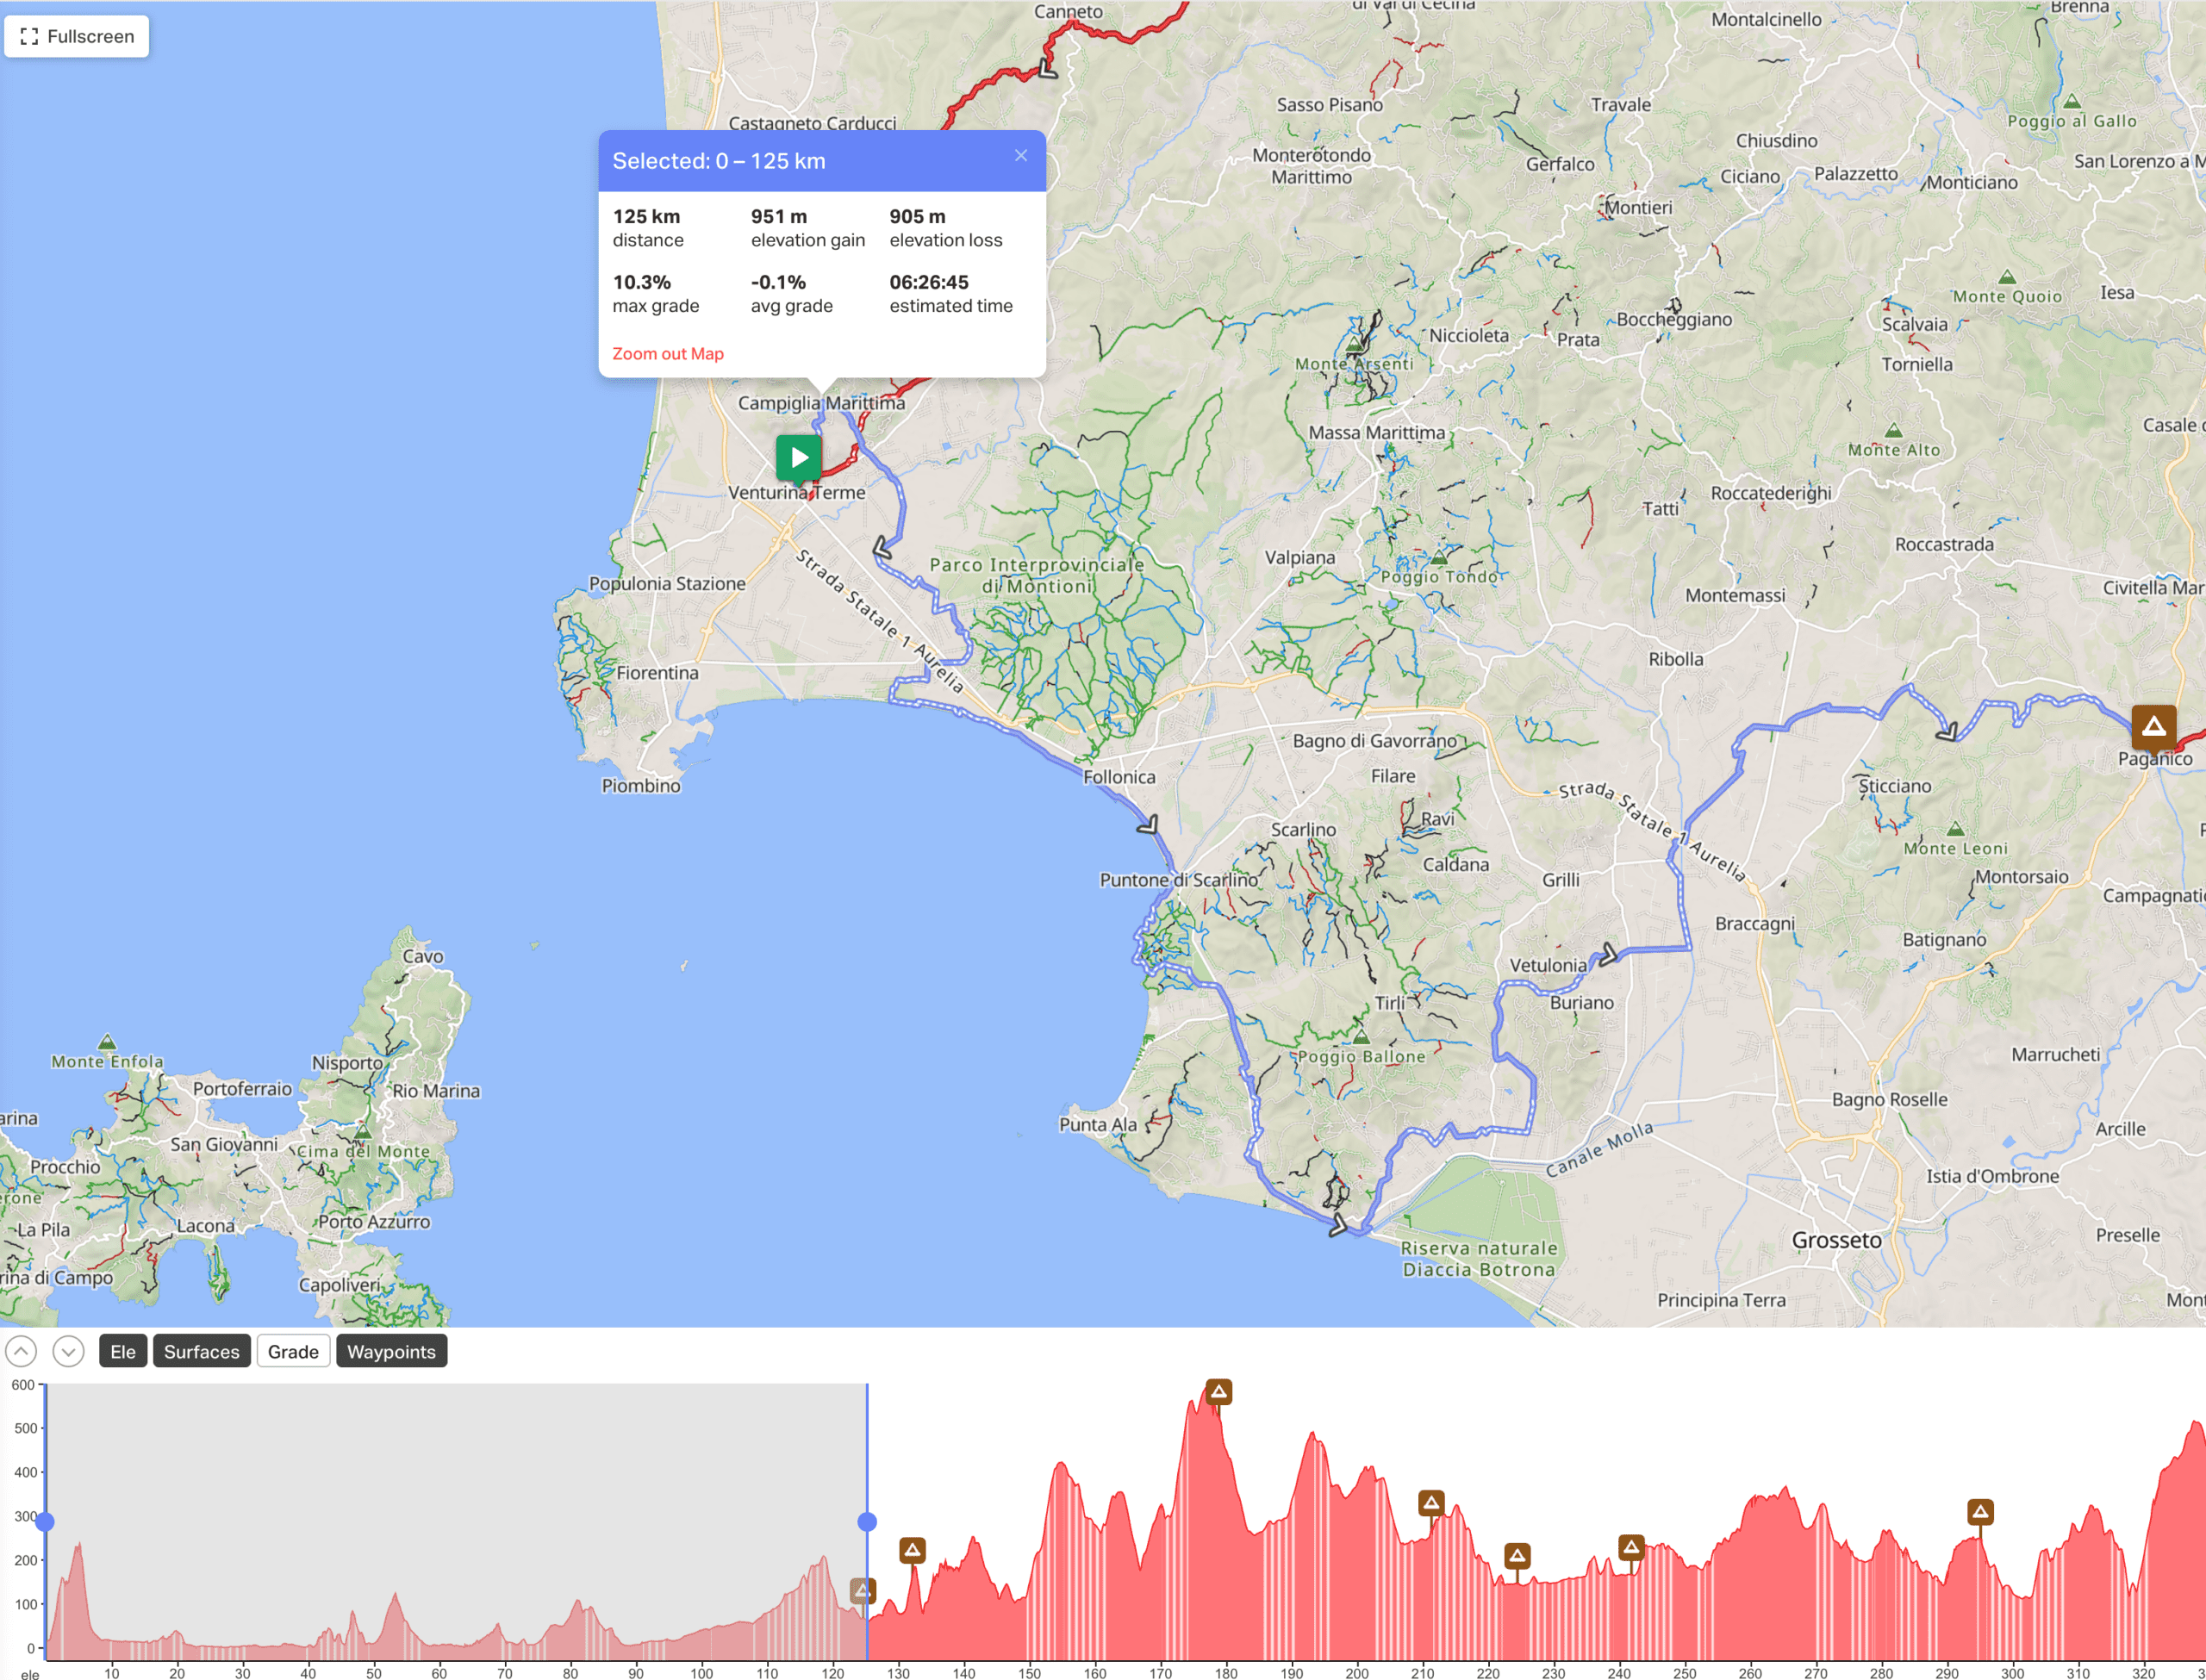
How to do it: open the route on Ride with GPS and use the elevation bar. Select from the start to the point where you want to finish each day: you'll immediately see the partial km and elevation gain for that section. Jot down these numbers for each day and you're set.
If you still prefer to split the route into separate files, you can do so with the Split Route function in Route Planner (desktop). To use it you first need to Copy to My Routes, creating a copy in your account. Keep in mind, however, that split routes are copies: they won't receive updates to the official route. If we update the course after your split, you'll need to redo the operation on the new version.
Check elevation, profile and POIs
With the route in your account you can analyze course details before departure.
Elevation profile
Opening the route on Ride with GPS (web) you'll see the elevation graph below the map. Hovering over the graph you can identify the toughest points and understand how much climbing you've done and how much remains each day. The interface also shows total elevation gain and loss next to the distance. In the mobile app you'll find total elevation and a profile thumbnail in the route details. In the desktop version there’s also a list of climbs and descents.
Route data
Ride with GPS also shows surface type (gravel vs pavement) and gradients, both on the map (with different colors) and in the details. Useful for knowing what to expect: technical sections, smooth white roads, asphalt.
Points of Interest (POI)
If we've added POIs to the track (checkpoints, base camps, fountains), you'll see them on the map as icons. Tap them to read the description. You can also add your own POIs before departure: water points, grocery stores, pharmacies, the accommodation you booked. In Route Planner, there's the Custom POI button to place them wherever you want, with different icons (a tent for camping, a fork for a restaurant) and notes.
By examining elevation for each stage, you can organize departure times, breaks, and resupply. If stage 2 has 2000 m of climbing concentrated in the first half, you know to start early and stock up on water beforehand. The goal is to know the route before riding it: fewer surprises, more safety.
Remember: you can search every location in the search bar.
Download the route for offline navigation
Navigating offline means following the route with your smartphone even without cell signal or data. On such a long and rural course it's essential. To do this, you need to download in advance the route and maps to your phone.
How to do it (mobile app)
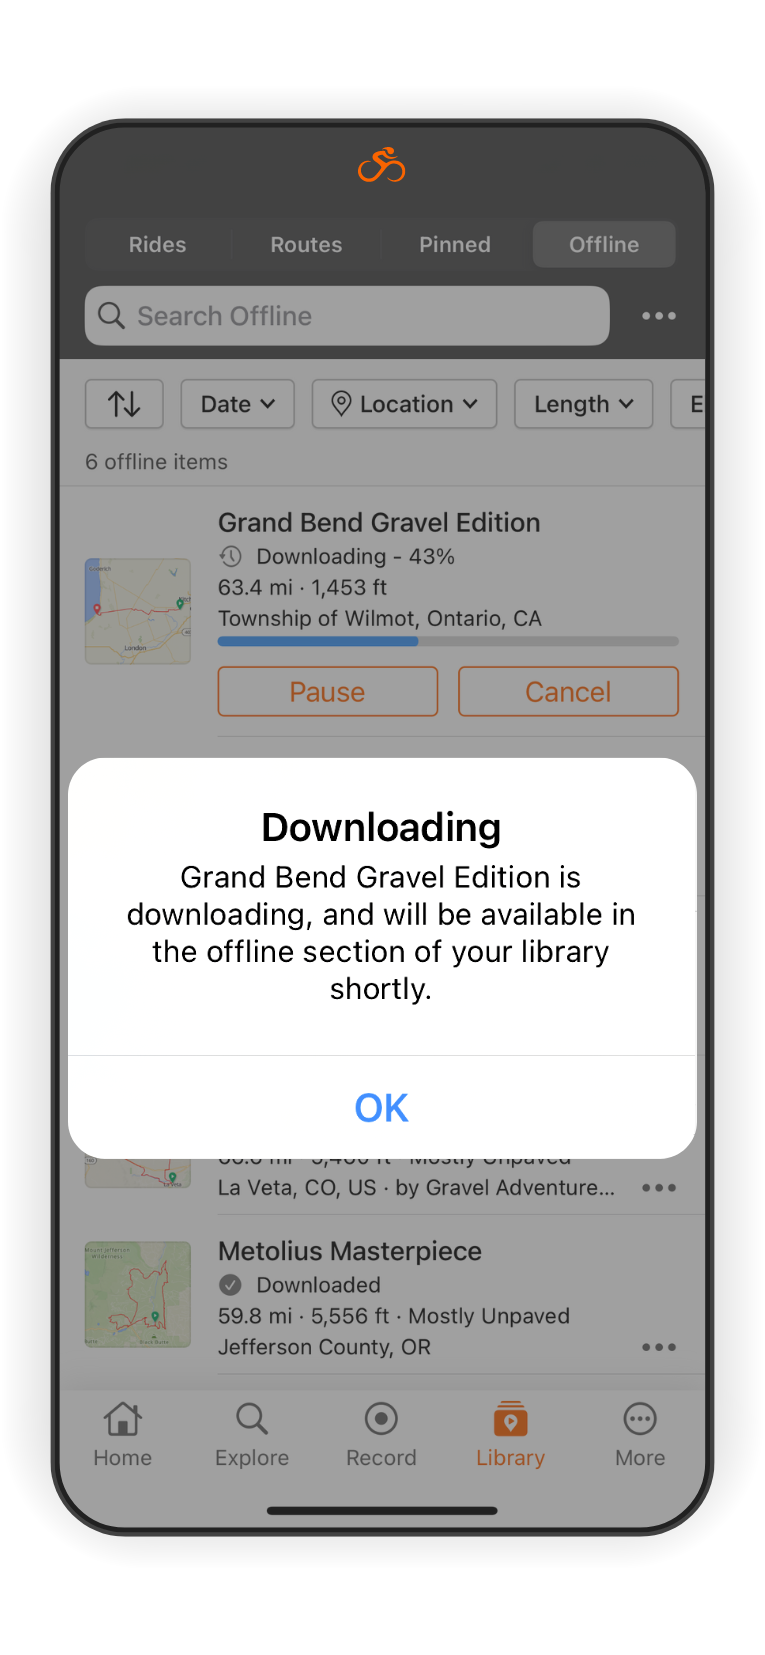
Open the Ride with GPS app and go to the Routes Library. For each route, tap Save then "Download for Offline". The route (with maps) will be saved to your device.
Best to download on Wi-Fi before departure: files can be large (around 20 MB for a 100 km route). If you have 4-5 stages, start the download with your phone charging and keep the app open until it finishes.
With offline maps you can navigate in airplane mode, saving battery and data. The app has everything it needs: map and route work without connection. To verify, put your phone in airplane mode, open the app, go to Library > Offline and start a test navigation.
For BAS participants: Premium features (offline maps, voice navigation) are already included in your registration. No upgrade needed: just redeem the 4 months premium trail linked to your registration.
Before departure, check that each stage shows the checkmark icon indicating complete download. If not, reconnect and repeat the download.
Navigation during the trip: using the app effectively
Let's see how to use your smartphone with Ride with GPS as a navigator while riding.
Starting navigation
Open the app, go to the Routes Library and select the route you want to follow. If you downloaded it offline, put your phone in airplane mode. Tap Navigate then Start to begin (this also records the actual track you're riding). The map will open centered on your position with the route highlighted.
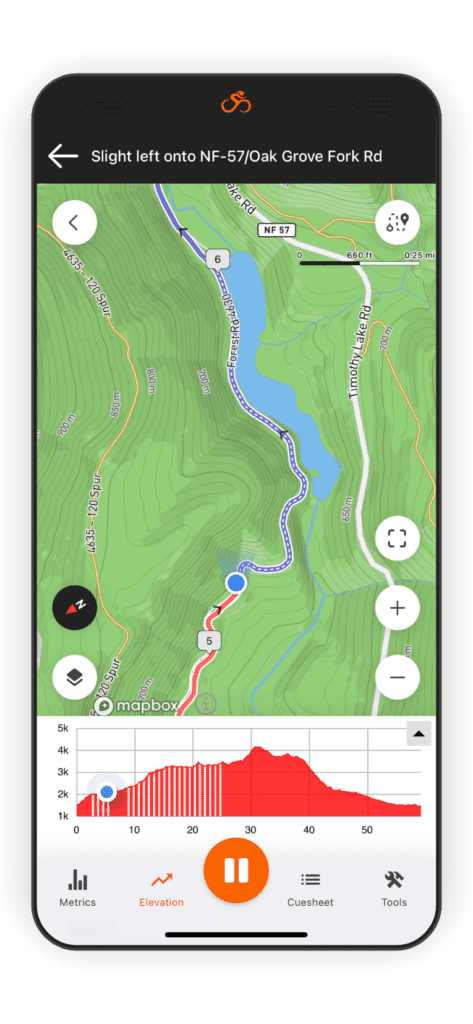
Turn-by-turn directions
The app gives you voice directions at every turn or junction. If your phone is in English, you'll hear something like "In 200 meters turn left onto Provincial Road 18". Besides the voice there's a visual indication on screen and an audio signal. It works like a car navigator, but on white roads and trails. If you prefer low volume you can still follow the route by watching the map.
Screen on or off?
Screen on = see the map but drain battery. Screen off = save battery but can't see the map. The best solution is to keep the screen off and rely on voice directions. The display is the main battery drain.
On Android there's Handlebar Mode: the screen stays off but automatically turns on a few seconds before each turn, then turns off again. Useful if you keep your phone mounted on the handlebars.
On iPhone you can enable banner notifications: each direction arrives as a notification on the lockscreen. Either way, voice works even with the screen locked.
If you want the map always visible, enable Keep Screen On in the app and connect your phone to a power bank.
Saving battery
Ten hours of navigation per day is normal. If your phone dies mid-stage, you have a problem.
Airplane mode always. In valleys and woods your phone drains battery searching for signal. With offline maps you don't need the network. Re-enable data only when you reach a town.
Screen off as much as possible. The display is what drains the most. Trust voice for turns.
No Live Logging. Sharing your position in real time burns battery. Send a message when you stop.
Turn off Bluetooth if you're not using external sensors.
Big power bank. At least 10,000 mAh, better 20,000. You can keep it connected to your phone in the handlebar bag while riding.
Don't enable your phone's Power Saving mode. Seems counterintuitive, but these modes often limit GPS or close apps in the background. Better to manage consumption manually.
If you go off route
The app alerts you with an "Off Route" message. Stop, look at the map and retrace your steps until you find the route again. In offline mode the app can't recalculate an alternative route, but you can enable the Global Heatmap to see where other cyclists have ridden and find a connecting path. If you have data coverage you can use the "Reroute" function.
Save and share stages
Sending routes to an external GPS device: if you prefer to navigate with a dedicated cycling computer (like Garmin, Wahoo or Hammerhead Karoo) instead of your phone, Ride with GPS makes this easy too. You can link your RWGPS account with Garmin Connect, Wahoo ELEMNT app or Hammerhead: once done, just "send to device" the chosen route and, at the next sync, it will appear on your GPS.
For GPS units: from the site there's the Send to Device button on each route page, or from the mobile app you can use Save > Send to device. Note: most Garmins can store a maximum of about 100 routes, so if you have many you might need to clean up.
File format: when syncing routes to your device through the integrations described above, the cue sheet and waypoints are automatically included. There's no need to manually export in TCX format.
Garmin Varia compatibility: if you use a Garmin Varia rear radar, the Ride with GPS app can show approaching vehicle alerts directly on screen during navigation.
This lets you have a backup on a second device, or simply use the navigator you prefer while keeping RWGPS as your planning base.
Recording and sharing your adventure: during navigation with the app, Ride with GPS records your activity (distance, time, actual track) unless you disable it. At the end of each day, after completing the stage, you can save the activity recording (tap Finish > Save Ride). This creates a record of your daily ride, which will appear in the Rides/Activities section of your account. These recorded activities can be shared with friends and on social media, complete with stats, map track and photos you've added. It's a great way to let others know your progress or, afterwards, to have a digital "diary" of the Tuscany Trail. You can also compare the recorded activity with the planned route out of curiosity, for example to see where you deviated or how closely you followed the track.
Backup: you can download the gpx version of the route to keep a backup, but do not upload it to other systems to use it during the event: the routing apps can change a route causing you problems during the event.

Add comment